

How to Set Up Your Child’s iPhone or iPad So You Don’t Regret the Defaults Later
If you just got your child an iPhone or iPad and your first thought was, “I don’t even know where to start,” you are not behind. You are in the exact spot a lot of parents land in.
The key is to do the first setup before the device becomes part of the daily routine. Once apps are installed, habits are formed, and your child feels like the device is fully theirs, tightening controls gets harder fast.
This guide is the practical version:
-
What to set up first
-
Which settings matter most
-
What parents commonly miss
-
and what Apple’s built-in tools can and cannot actually do
Quick-start: Before handoff, set up Family Sharing, turn on Screen Time, add a parent-only passcode, lock down installs/purchases/account changes, and choose your web + communication defaults. For most families, that one 20-to-40-minute pass prevents the most common “I thought that was already blocked” problems.
You do not need a perfect lockdown. You need a safer starting point that feels normal from day one.
Best promise for this article: set the defaults now so you do not spend the next month trying to claw them back later.
Start here: the first 5 things to do before you hand over the device
If you only do one focused setup pass, do these five things first:
-
Set up the device through Family Sharing and use a child account if possible
-
Turn on Screen Time immediately
-
Create a Screen Time passcode your child does not know
-
Review app installs, deletions, purchases, and account changes
-
Decide your web access and communication rules before first regular use
Those five moves will not solve everything. They will handle the highest-leverage defaults before the device starts drifting into daily life.
Why the first setup matters more than parents expect
A lot of later conflict is really cleanup from loose defaults.
-
Once your child thinks downloads are open, later approval rules feel like punishment.
-
Once bedtime use is normal, adding downtime becomes a nightly fight.
-
Once web access is broad, narrowing it later feels like something was taken away.
That is why setup before handoff is so much easier than cleanup after drift.
Before you touch settings, decide what this device is actually for
This is the part many families skip, and it is why setup gets sloppy.
Ask:
-
Is this mainly for family communication?
-
Is it mainly for school, reading, and homework?
-
Is it mostly for travel, downtime, or a few approved games?
-
Will it stay at home, or go everywhere?
-
Does your child need broad app access, or a small approved set?
The best setup is not the strictest one. It is the one that matches the real job of the device.
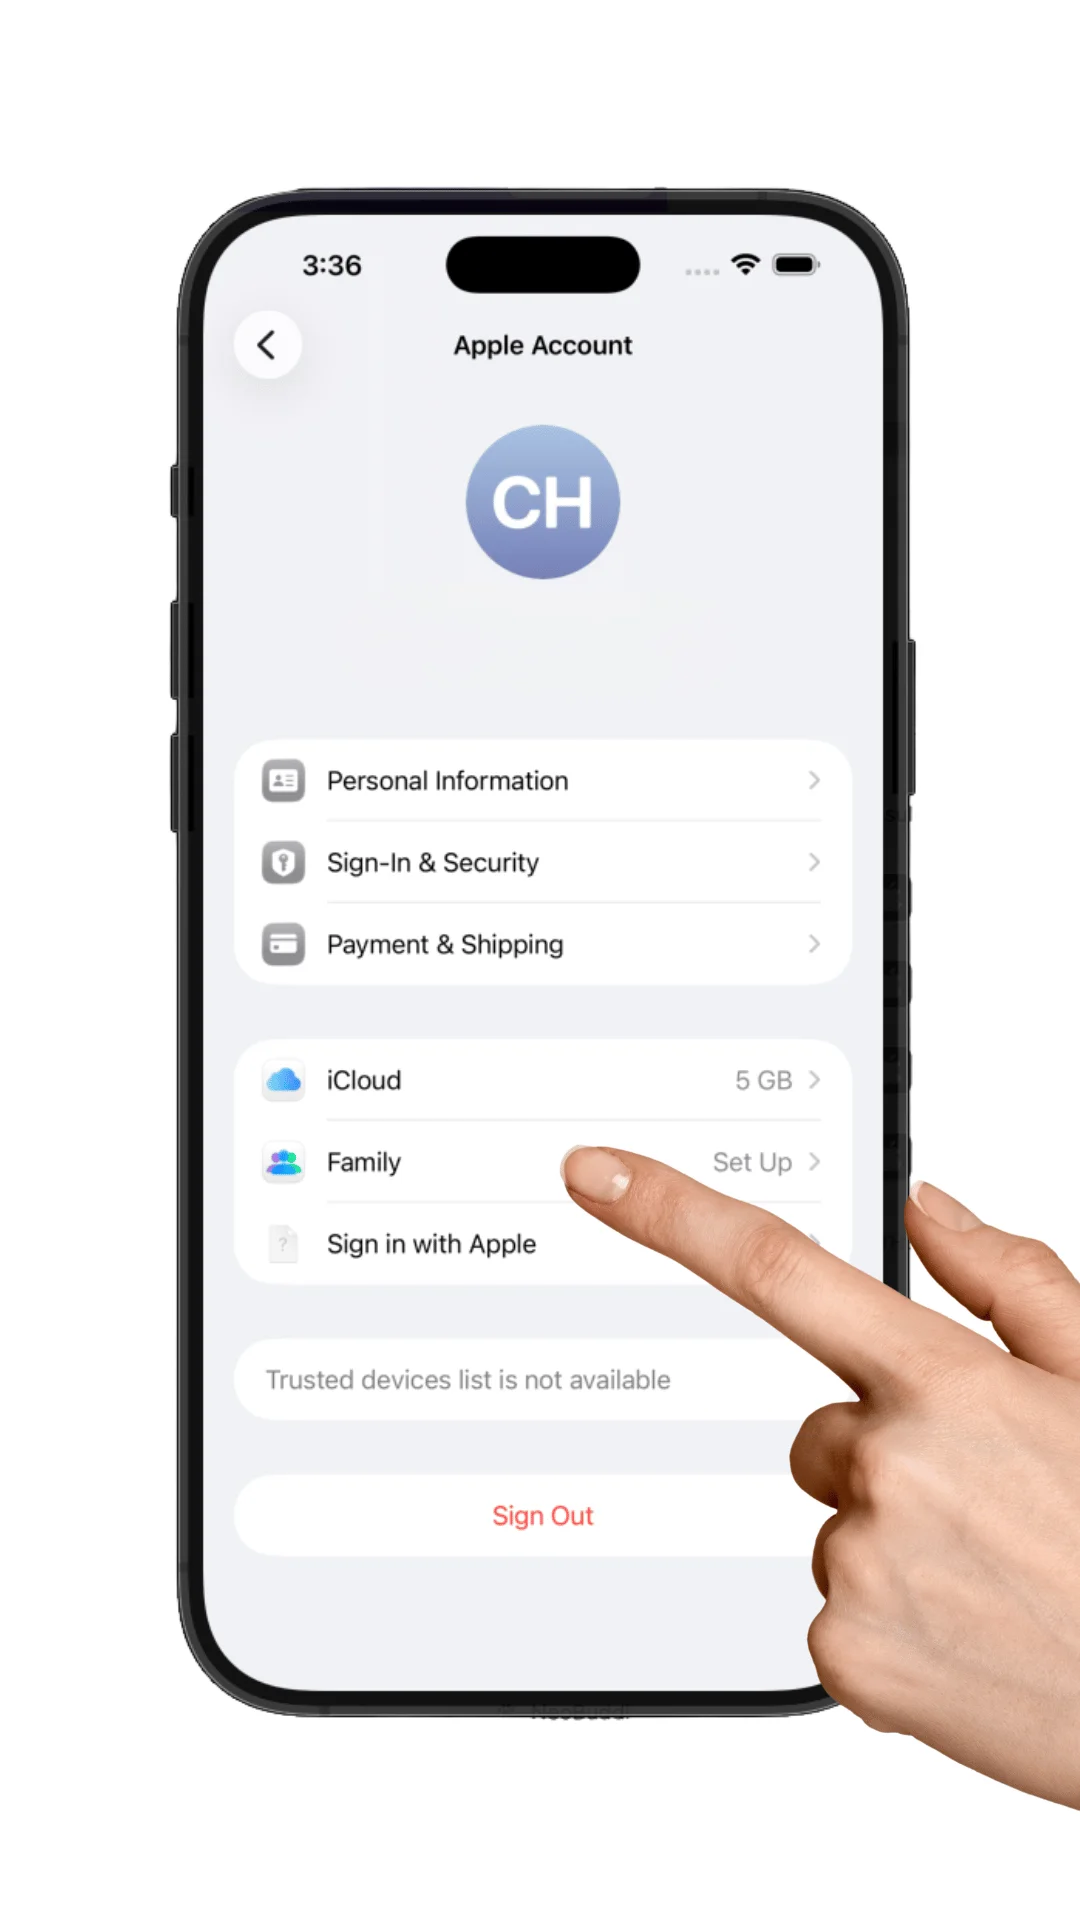
1. Set up Family Sharing and use a child account if possible
If you are starting fresh, begin here.
Apple’s parental tools work more cleanly when the device lives inside your family structure instead of using a shared login, an adult account, or a rushed workaround.
At a practical level, you want:
-
your child connected under your family setup
-
approval tools available where appropriate
-
one clean foundation for later controls
If the device is already in use, you can still tighten things up. It is just easier before the device already feels fully unlocked and fully personal.
If you are an Android parent managing a child’s iPhone or iPad, you can still create meaningful controls. Just expect some Apple management tasks to be smoother from an Apple device or directly on the child’s device.
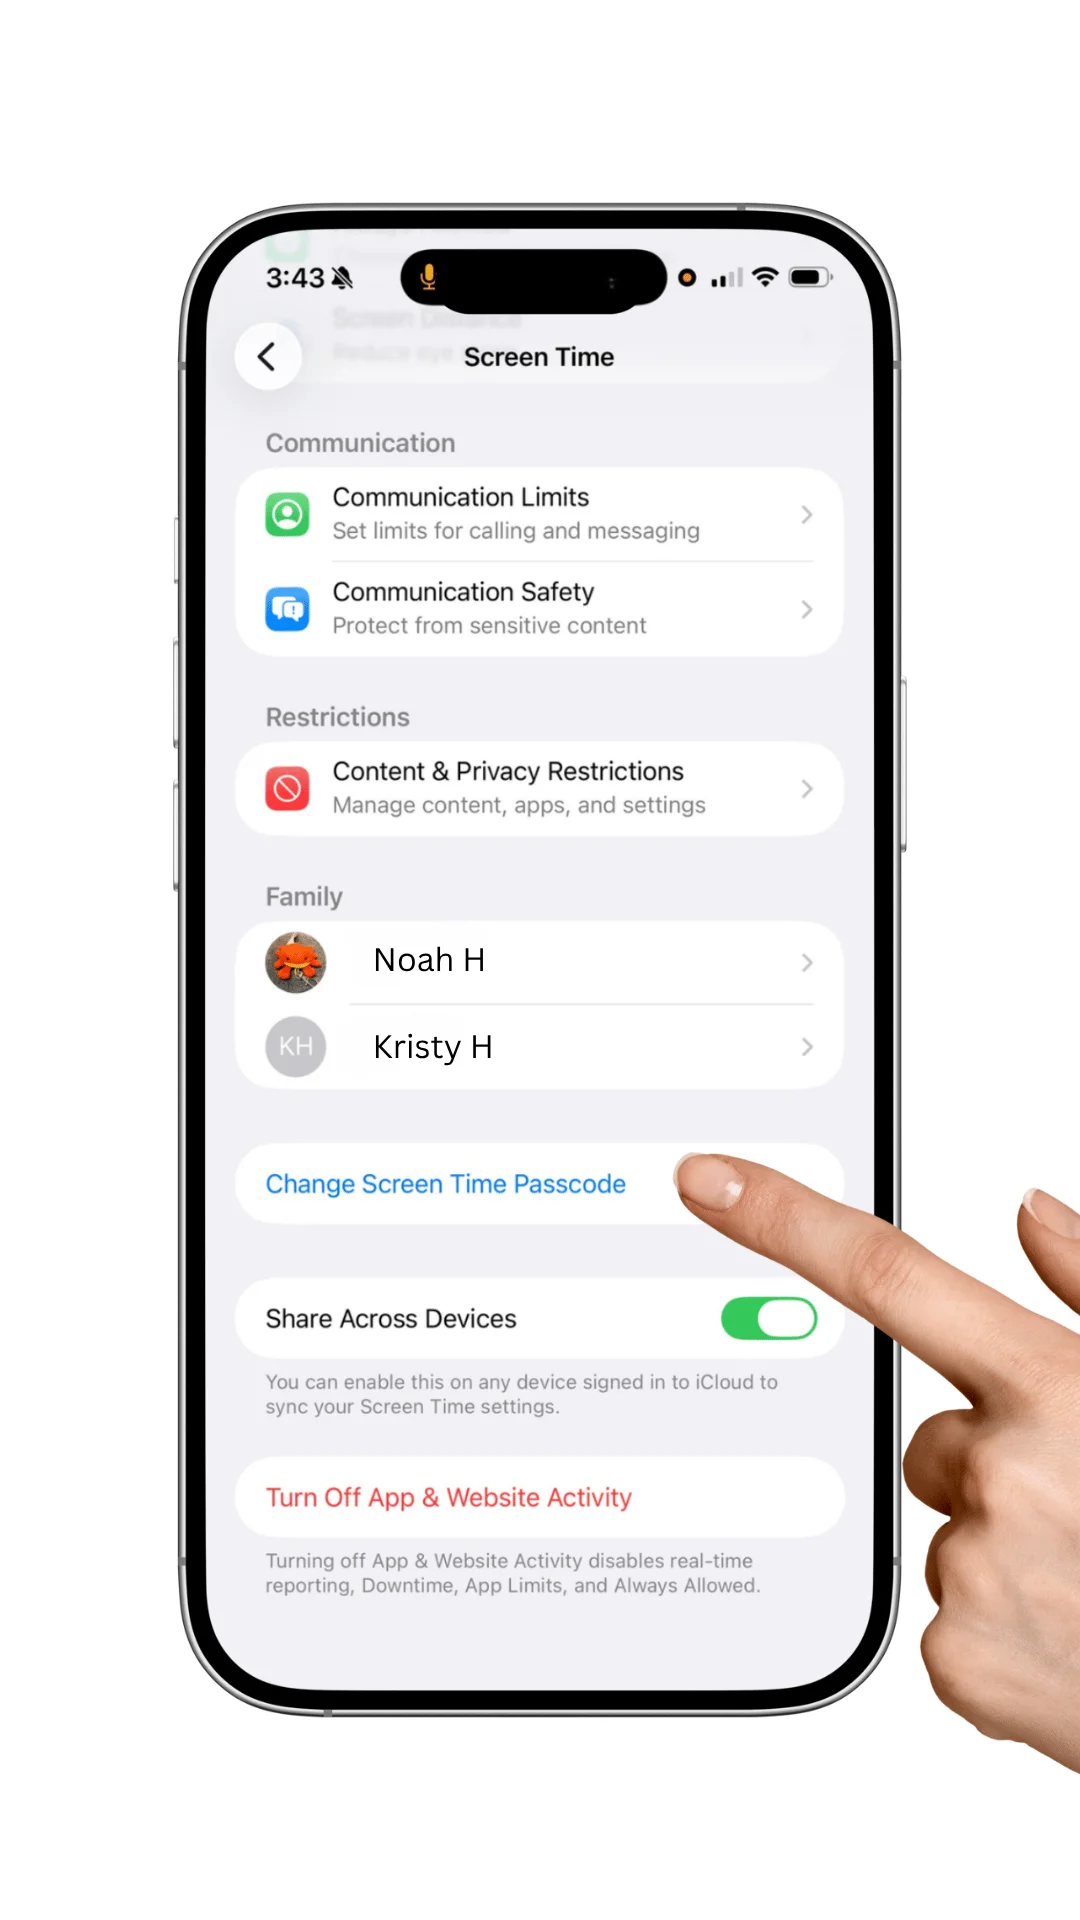
2. Turn on Screen Time right away, and lock it with a parent-only passcode
For most families, Screen Time is the main control center. And one of the most common failures is simple:
Parents turn it on, but they do not fully secure it.
If your child can change the settings, the setup looks tighter than it really is.
After you enable Screen Time:
-
set a passcode your child does not know
-
store it somewhere you will not lose it
-
confirm it protects changes to limits and restrictions
 This is boring setup work. It is also the step that prevents the classic parent realization three weeks later that the control panel was never really under parent control.
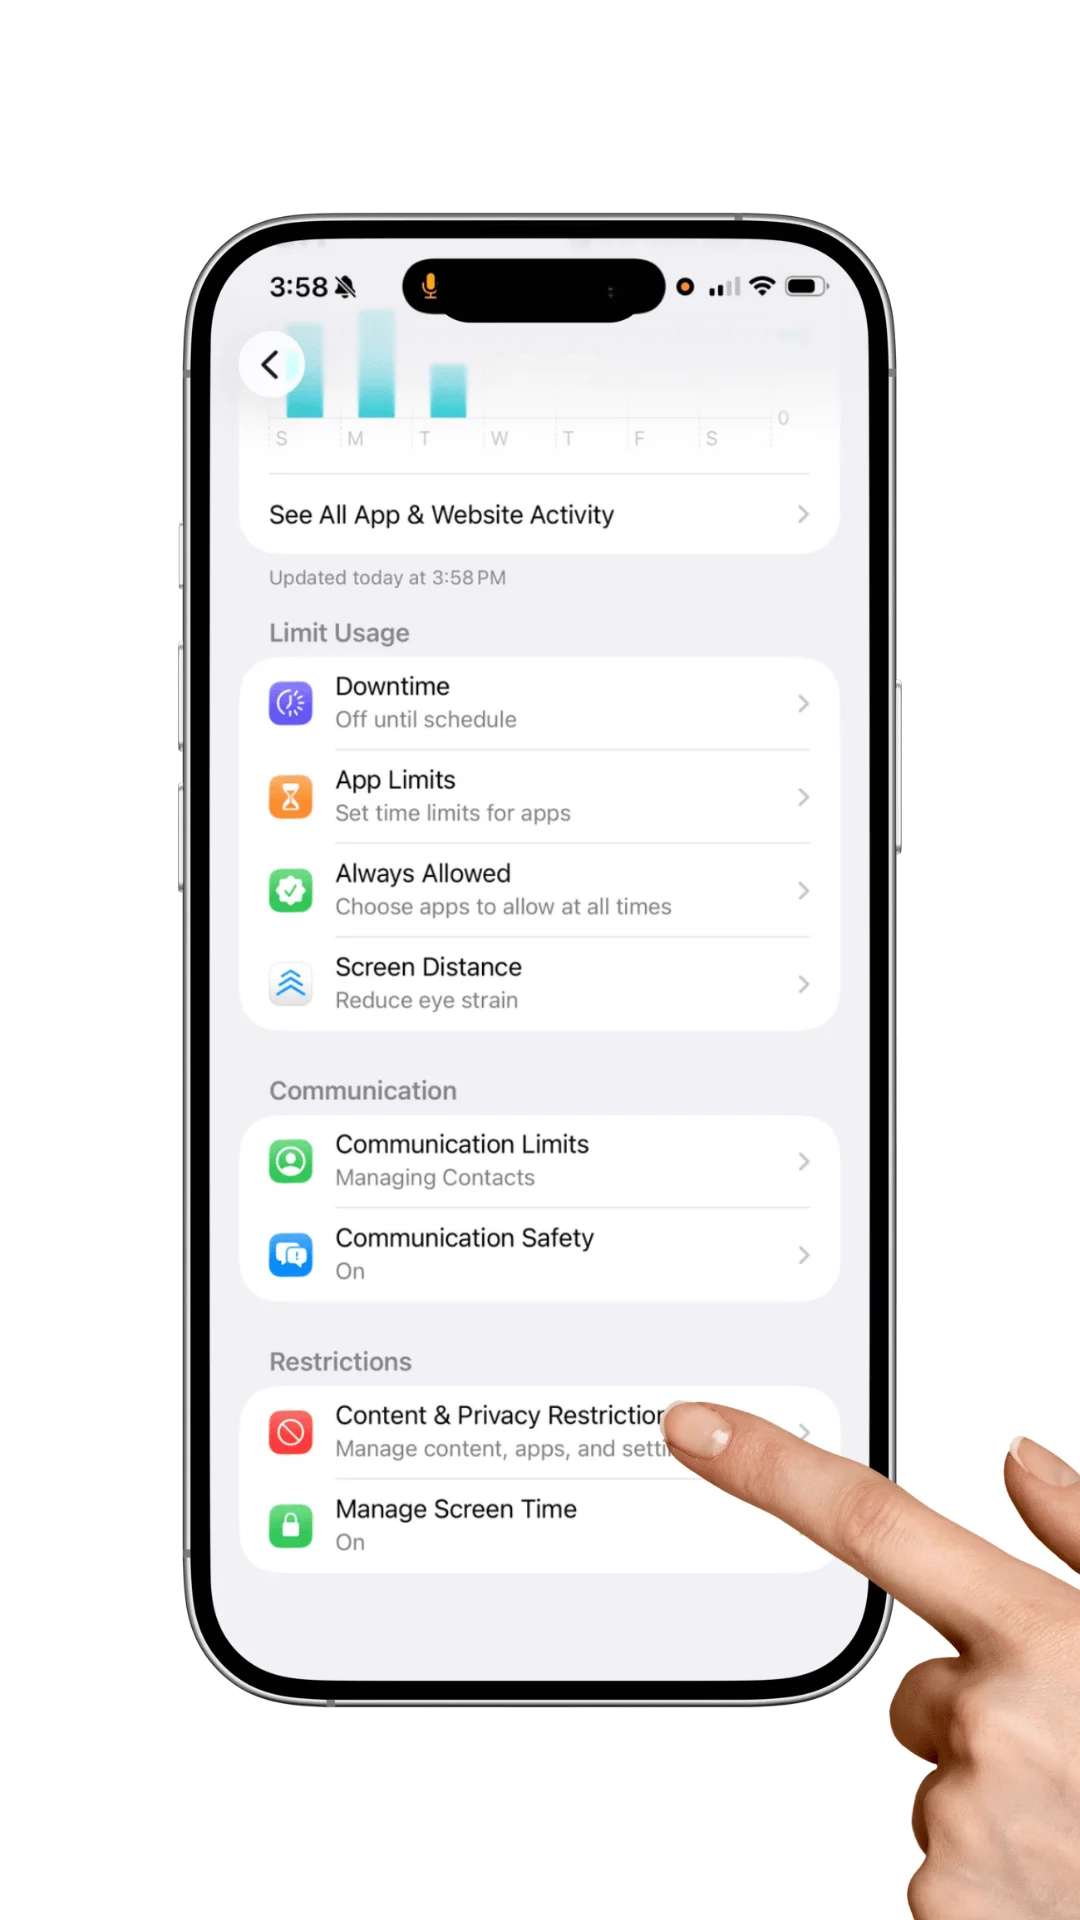
3. Use Content & Privacy Restrictions before the device gets busy
This is where you decide the defaults before apps, permissions, and assumptions pile up.
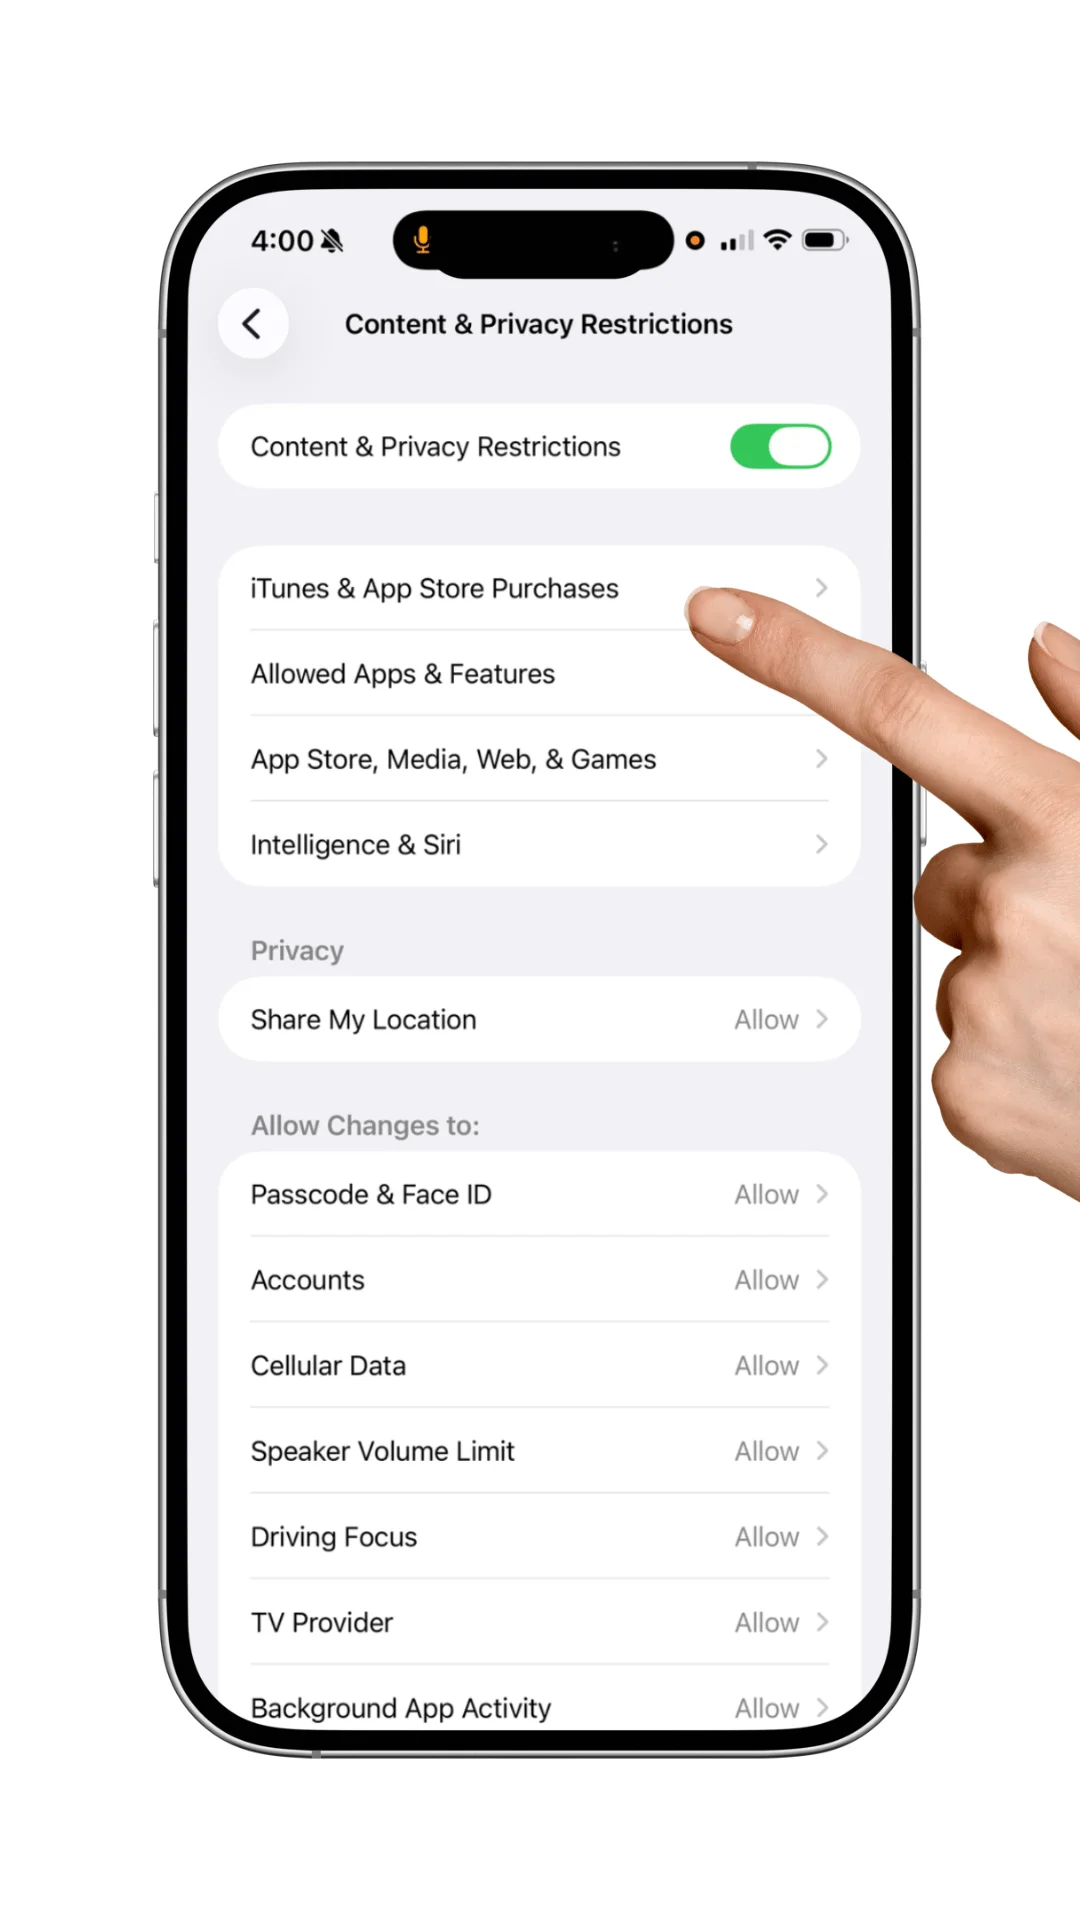
Review settings for:
-
App installs
-
App deletions
-
In-app purchases
-
Account changes
-
Privacy permissions
-
Explicit media
-
Web content restrictions
 You do not need the tightest possible setting in every category. But you should know exactly which changes your child can still make on their own.
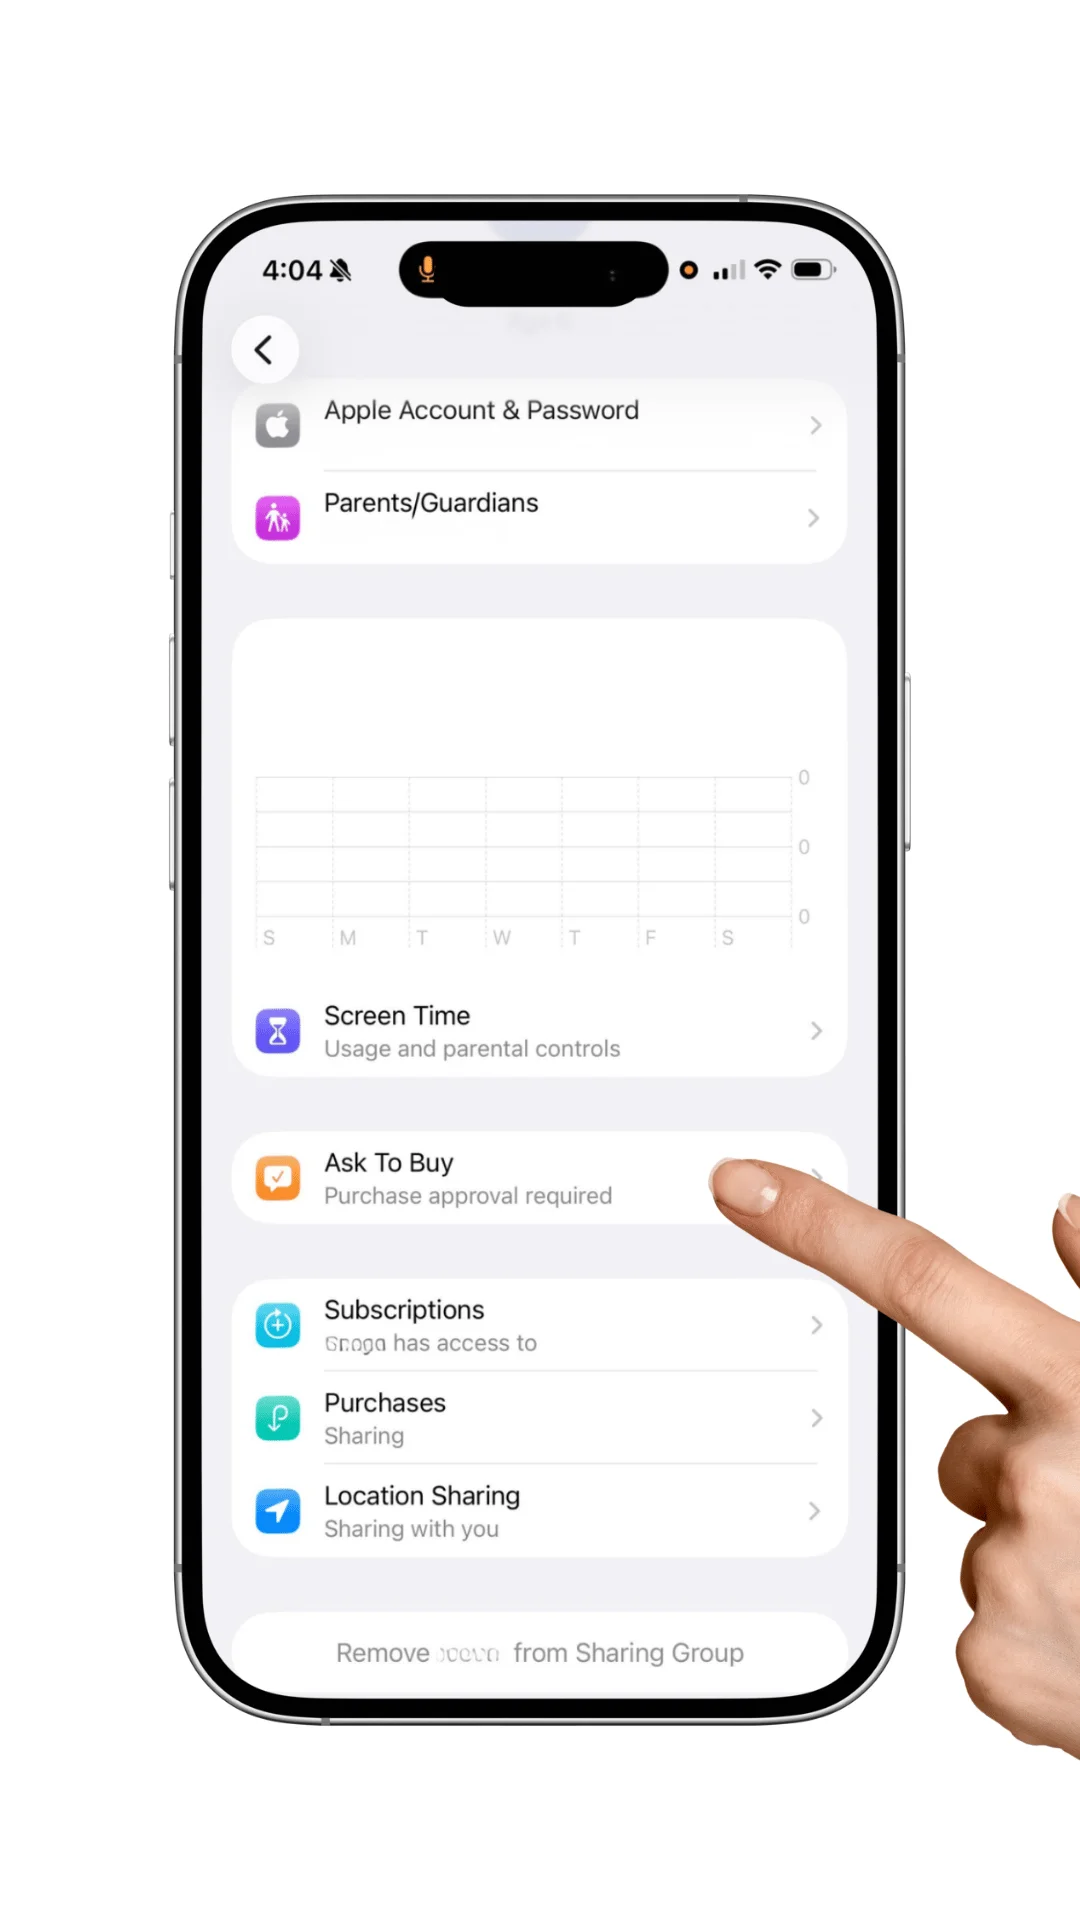
4. Review installs, deletions, purchases, and account changes early
If you only tighten a few things first, this section deserves real attention.
These settings sit behind some of the most common parent surprises:
-
“I didn’t realize they could download that without asking.”
-
“I thought purchases already needed approval.”
-
“I blocked it once, but it came back later.”
-
“I didn’t know they could still change that account setting.”
Those are not weird edge cases. They are standard failure patterns when the original setup is too loose or too rushed.
TIP: Under Settings -> Family -> Your Child Profile -> Enable Ask To Buy
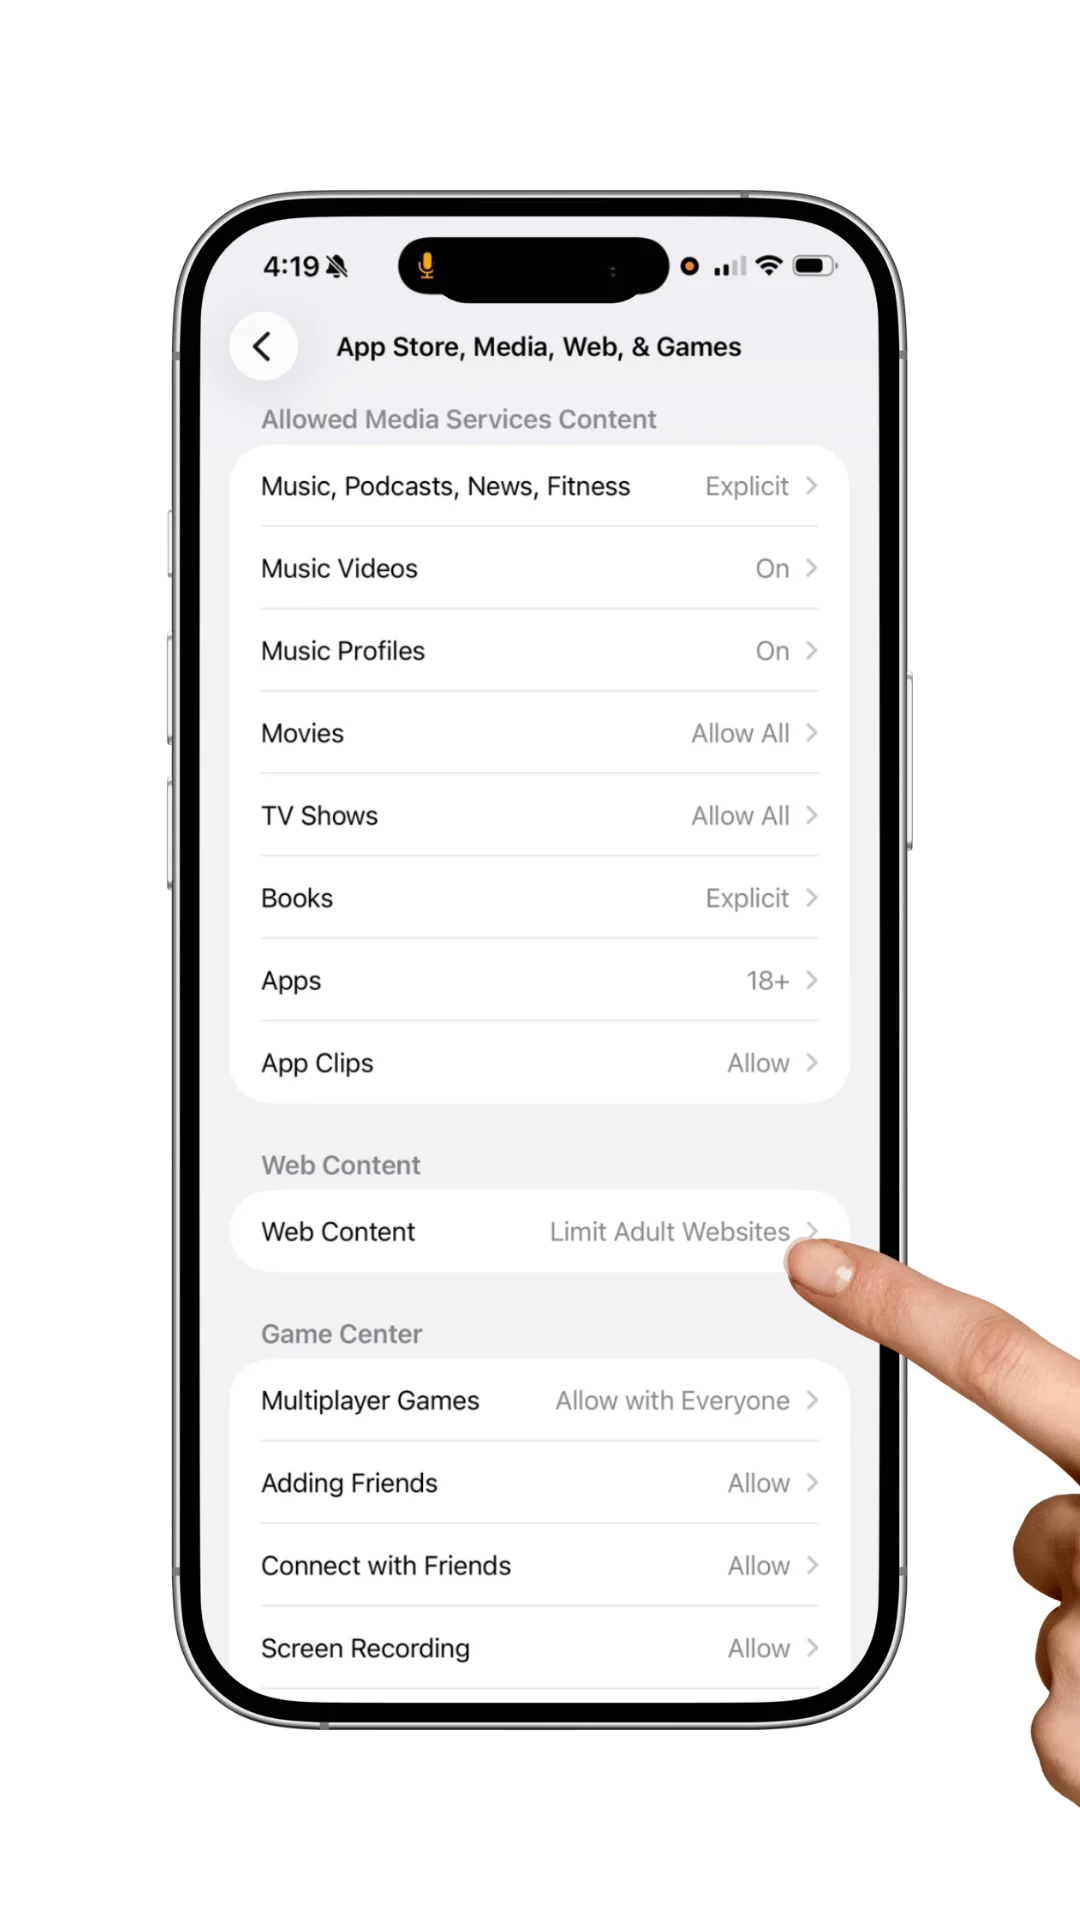
5. Decide how open web access should be before handoff
This is where parents often think they are covered when they are only partly covered.
Apple gives families useful web-content controls. But the real question is bigger than Safari alone.
Limiting one browser is not the same as limiting every path to web content.
Depending on what is installed, a child may still hit the web through:
-
other browsers
-
in-app browsers
-
video or social apps with built-in web access
-
apps with links, search, or quietly reopened browser paths
So the better parent question is not, “Did I touch Safari settings?” It is, “How open is this device to the web overall?”
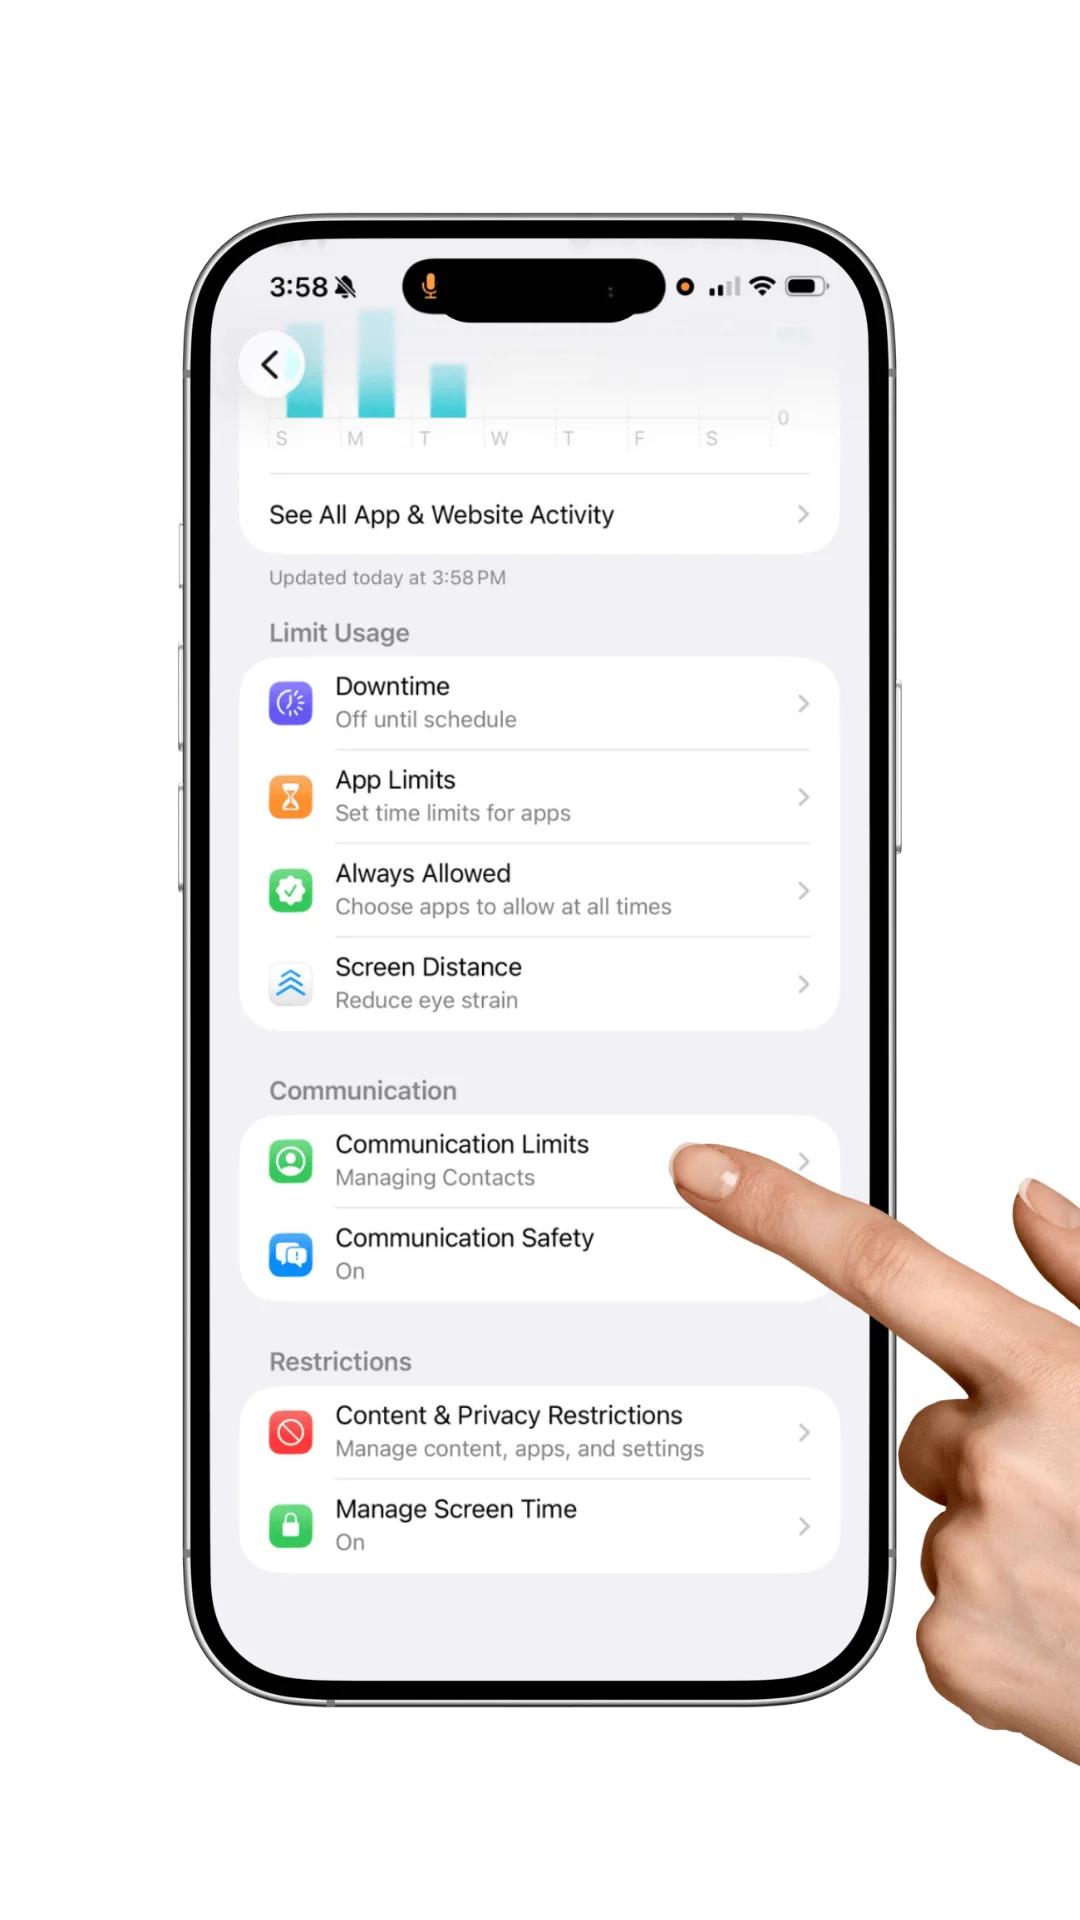
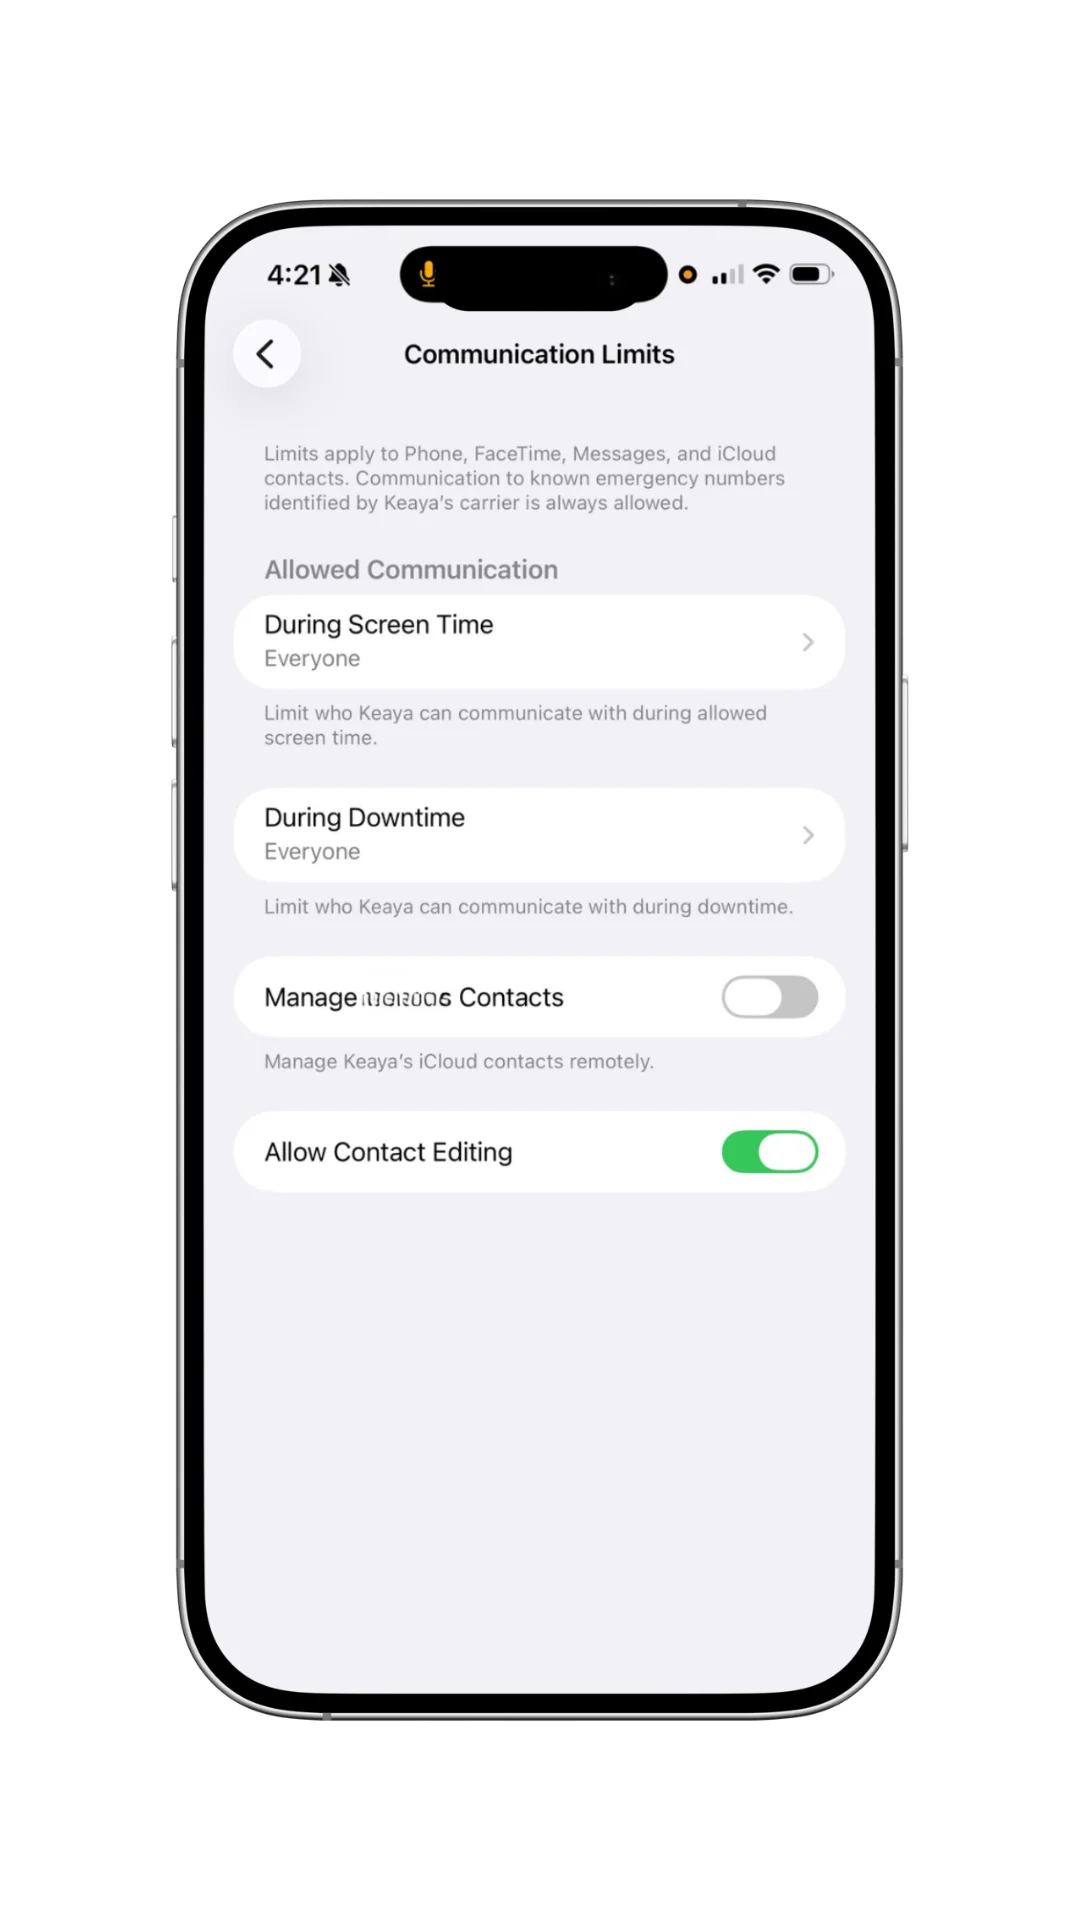
6. Set communication limits and contact boundaries intentionally
For some families, the device is mostly for parents, grandparents, school logistics, and a few known contacts. For others, communication is where the friction starts.
Decide in advance:
-
who your child actually needs to contact
-
who can contact your child
-
when communication should be open, limited, or quiet
If you wait until there is already awkward contact, late-night messaging, or constant notification noise, the conversation gets harder.
7. Use downtime and app limits to support routines, not just react to conflict
Downtime and app limits work best when they are part of the device from the beginning.
That can mean:
-
less negotiation before bed
-
cleaner school-night routines
-
better boundaries during homework time
-
fewer random arguments about whether the device should be in use right now
Set early, they feel like normal family rules. Added late, they feel like punishment.
Common parent mistakes that create avoidable problems
Common parent mistakes box:
Waiting until after handoff: by then the defaults already feel like rights.
Turning on Screen Time without a passcode: that creates the appearance of control without much real control.
Checking one setting and assuming the whole device is covered: web, apps, purchases, and communication are separate decisions.
Leaving account changes open: a strong-looking setup can still unravel if key settings remain editable.
Using adult defaults for a child device: convenience now can create weekly cleanup later.
Not testing the rule on the device: it is worth confirming a few important limits actually behave the way you expect.
None of this means parents are careless. It means Apple setup often feels more complete than it really is unless you do one intentional pass.
Concrete failure patterns parents run into all the time
A few examples make this easier to spot:
-
The “Screen Time is on, so we’re covered” trap: Screen Time was enabled, but no parent-only passcode was protecting changes.
-
The “Safari is limited, so the web is limited” trap: another browser, an in-app browser, or a web-enabled app quietly became the new path.
-
The “I blocked the app” trap: the app was deleted, reinstalled, or replaced by a similar app because installs or account changes were still too open.
Those examples are why Apple’s tools are best understood as guardrails, not magical omniscience.
When Screen Time looks off, confusing, or inconsistent
Sometimes Screen Time feels like it is telling a different story than what the family is seeing in real life.
If that happens, start with the basics:
-
confirm Family Sharing is set up correctly
-
make sure you are viewing the right child account and device set
-
check that the relevant devices are updated
-
separate a reporting issue from a restriction issue
-
test an actual rule on-device instead of trusting the summary screen alone
That does not make the experience less annoying. It usually does help families troubleshoot more calmly and more accurately.
Be honest about what Apple’s built-in tools can and cannot do
Apple’s native controls are useful. They can help families:
-
shape safer defaults
-
reduce accidental exposure
-
limit installs and purchases
-
set time boundaries
-
create more structure around communication and access
But they are not full visibility into everything that happens inside third-party social apps, private messaging threads, or every web path that a device may surface over time.
That is where a lot of parent frustration starts: expecting one built-in system to do every job.
Find My can help, but treat it as useful signal, not perfect truth
For many families, Find My helps with pickups, logistics, and lost-device recovery.
That can be genuinely useful. Just treat location features as helpful signal, not flawless real-time truth.
Adjust by age and stage
You do not need one permanent setup. You need a starting point that can evolve.
Younger kids
Tighter defaults usually make sense. Less open browsing, fewer apps, fewer moving parts.
Tweens
Keep meaningful guardrails in place and loosen gradually based on maturity, not just age.
Teens
The job shifts toward guided independence. More freedom may make sense, but it works best when it is discussed, earned, and reviewed.
Some families may want supplemental tools
Apple’s tools are a solid foundation for many homes. They are just not the whole stack for every family.
Some parents may want an added layer if they need:
-
stronger filtering
-
more consistent controls across different device types
-
different alerting or visibility features
-
a setup that better fits a more complex family-device mix
The useful mindset is not “Apple or nothing.” It is “use Apple well first, then add more if your family genuinely needs it.”
Even after you lock down the device, the next problem is still there
Once the device itself is reasonably set up, many parents hit the next question:
When my child needs help with homework, questions, or curiosity, where are they supposed to go?
That is the real handoff after device setup.
Even after parents lock down the device, many families are still choosing between the open internet and generic AI tools that were not built for kids.
That is the gap NeoBuddi is built around.
Apple can help you make the device safer. NeoBuddi is being built to give kids a safer, calmer place to go when they need homework help, guided explanations, or support for curiosity, especially for curious and neurodiverse kids who need something more trustworthy than “just search it” or a generic chatbot.
So the progression looks like this:
-
set up the device thoughtfully
-
close the obvious gaps before handoff
-
then give your child a better learning tool than the whole internet
Get the printable checklist
If you want a version you can use during setup, share with a spouse, or save for the next device, grab the printable checklist companion.
It includes:
-
a quick-start setup list
-
the most important settings categories to review
-
common mistakes and weak spots to double-check
-
a calm summary of what Apple can and cannot do on its own
FAQ
Is this just for iPhone, or does it help with iPad too?
The same setup logic applies to both, even if some menus or labels vary.
What if I use Android and my child has an iPhone?
You can still create meaningful controls, but some Apple family-management steps are smoother from an Apple device or directly on the child’s device.
How long does a solid first setup take?
Many families can do a strong first pass in 20 to 40 minutes, though a more detailed setup can take longer.
What if the device is already in use?
You can still improve the setup. Just expect the conversations to be a bit harder than if the boundaries had been there from the start.
Will this solve everything?
No. Apple’s built-in tools are guardrails, not total protection or total visibility. Ongoing conversations, check-ins, and family rules still matter.
Why is NeoBuddi offering this guide?
Because safer devices are only part of the picture. Families also need a safer learning option once kids start using technology for homework, questions, and curiosity.
Important note about Apple menu labels
Apple changes menu names and setup flows over time. If a label looks different on your device, look for the closest Screen Time, Family, or Content & Privacy option for your current iOS or iPadOS version.
